Tuesday, January 29, 2013

200,000!

It's a milestone day for us here at the de Jong Dream House. Today we hit 200,000 page views. Still small potatoes compared to the major bloggers, but it's big news for us.

A little history:

  • We started this blog on May 22, 2011, thinking only our family around the world would see it.
  • We hit 5,000 page views on August 4, 2011, 11 weeks into the blog and 24 days into our build, the day the trusses for our roof went up. We started to get the idea that other home owners were looking for people like us who somehow found the time to document each step and decision of the process.
  • We hit 100,000 page views on July 29, 2012, 14 months from launch, our fifth anniversary, and five months after we moved in. We learned that not only did the folks who watch our house being built stick around, but we made new friends as more visitors were curious to see how we made our house a home.

  • Today, January 29, 2013, we reached 200,000 page views, just 6 months after hitting 100,000. We are settled in and enjoying life, still learning new ways to be green.

Thanks to all our friends, old and new, for sharing this adventure with us. If you'd like to stay informed, please considered following us via email, RSS, or on Facebook

Sunday, January 27, 2013

Uses for Tension Rods


I love tension rods for organization. And, if the popularity of our tension rod spice drawer post is any indication, our readers do, too. Here are some of my favorite ways to use tension rods around the house. 

1. Drawer Dividers

When we were building our house, I knew I wanted a large spice drawer under the cooktop. I cook from scratch nearly every night, and our menu is international, so my spice collection is larger than average. Our cabinet maker gave me just what I wanted! I opted against putting custom dividers in because I wanted flexibility, and also to save a good amount of money. Instead, I bought a couple of tension rods like these.


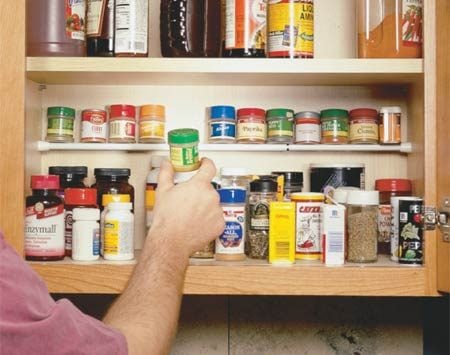
If you don't have a shallow drawer like ours, you can also use tension rods in a cabinet, like this example from Family Handyman.
Tension Rod Spice Holder by Family Handyman
2. Lid and Pot Holder Holder
I'm sure there's a more eloquent way to say that, but it's not coming to me at the moment. Just under our spice drawer is this deep drawer for holding my pots, pans, matching lids, and pot holders.


Here's the view from the other side. This drawer has my most commonly used pots and pans. I keep the lids of the bigger pans nestled in their partner, but the other lids are tucked into a tension rod. I found that the rod also is a nifty place to keep my pot holders. 
Here you can see the two drawers together. There's a third drawer for my less-often used pots and pans, and yes, there is a tension rod for the lids in that drawer, too.

3. Bottle Holder
We have two sinks in our kitchen. Underneath each one, we have a tension rod for bottles. The prep sink holds more food-related sprays, like produce wash. The front sink has more typical cleaners. We are transitioning to making our own cleaners so I will have nice pretty matching bottles in about a year.


If you look closely at the photo above, you can see that we have labeled our outlet. Fun fact: If the instahot will not be used for a day or so, it is recommended that you unplug it to avoid burning up the motor. Um...oops. 

4. Pan Divider
In our house, we opted for custom pan dividers above our ovens. I LOVE this because I know that I will never use this space if I have to stack things. 

I'm only 5'4", so I can walk under this cabinet with the doors wide open with no worries of hitting my head. 

Of course, I labeled the slots.


However, if you don't have custom slots, you can make your own with tension rods, like in this photo from Martha Stewart. The nice thing about this option is that you can use any cabinet. 

Tension Rod Slots via Martha Stewart
4. Curtain Rod
Because of our thick ICF walls, we have very deep window sills. In order to enjoy the sills, we had to be creative with our curtains. Hello, tension rods!


We came up with this idea quickly after we moved in and realized that a big window in our powder room wasn't the best idea! In this room, we put the rod all the way to the top of the window frame.


We put the same idea to work in our master bathroom, except that we lined up the rod with the prairie grid.


And we actually used a shower rod. That add perspective on the size of this window!


5. Portable Drying Rod
One area in which we saved money was in the laundry room cabinets. Rather than putting up cabinets across the top of the sink, we left it open. Everything I need (and more) fits in that linen closet on the left. 


However, in the rare time when we want to hang dry an item, I can whip out a curtain rod and let the item dry over the sink. We haven't had a need for it yet, but if we needed something to dry flat, we could put a second rod up there and lay it over the two.


6. Hiding Clutter
You won't see a lot of photos of our basement yet. We saved a LOT of money by leaving it unfinished for the time being. With our son being young, it's nice to have a big open space for him to play freely. We do have plans to put in a wall and shelves for our storage area this year, but other than that, we'll keep it unfinished for a few years. (We did put in lights and outlets, so it is all usable space in the meantime). Until our storage room is ready, we have our extra household supplies under the stairs, like this.


It's a bit of an eyesore, until I realized I could put up some curtains using command strips and tension rods. I just stuck the command strips on the support pole and wood frame, and hung rods on them. 


7. Book Nook
Also known as the super secret hiding place, a shower curtain and rod was all it took to create our son favorite hangout.


A slight variation of this that would work in any house is this doorway puppet theater.

Doorway puppet theater via Craft Gossip
8. Key Holder
This actually uses a magnetic cafe rod instead of a tension rod, but depending on your space, either option can work. We have this on the door between our garage and mudroom. It's a convenient place to put our keys and sunglasses when we are removing our shoes.


Thus concludes the list of way we use tension rods in our house, but compiling this list got me curious about what other creative folks are doing.

9. Craft Storage
At some point I will have a craft room. I like this idea for storing wrapping paper or rolls of vinyl for my new Silhouette Cameo.

Tension Rod Paper Storage via BHG
Tension rods can also be used for holding ribbon.
Tension Rod Ribbon Holder via Sew Many Ways
10. Shoe Storage
Shoe Rack via Pancake & French Fries
11. Christmas Ornament Valance
I bought Christmas ornaments on clearance December 26 because I love this idea and want to do it next year. It'll look great in our two great room windows.
Christmas Ornament Valance via The Spunky Diva
12. Paper Roll Holder
One of the cooler ideas I found was this DIY coloring table using a roll of paper on a tension rod under the family table.
DIY Coloring Table via Heart, Home & Hunger
13. DIY File Cabinet
This is a lot cheaper than a filing cabinet!
Tension Rod File Cabinet via Split the Lark
14. Paper Towel Holder
I may need to use this idea with my Un-Paper Towels made.

Shoe Rack via Creative Paper Towel Storage via Alejandra.tv
Do you have any original idea for tension rods? I'd love to hear them!

Linked to:
36th Avenue * 52 MantlesAlderberry HillBetween Naps on the Front Porch * Blissful & Domestic * Classy ClutterClean & Scentsible * Coastal Charm * Craftberry Bush * Crystal & Co * Dedicated HouseDIY DreamerDIY Showoff  * Fluster BusterHappy Go LuckyHome Stories from A to Z * House of Hepworths *  I Heart Naptime * I Heart Organizing * I'm an Organizing Junkie *  It's Overflowing * Kurtz Corner * Made in a Day * Miss Information * Mums Make Lists *  My Uncommon Slice of Suburbia * New Nostalgia Nifty Thrifty Things * A Night Owl * Organize Your Stuff NowRainbows & Honeysuckles * Shabby Creek Cottage * Sorta CrunchySumo's Sweet Stuff * That's What Che Said  * We Are That Family

Thursday, January 24, 2013

Heritage Gallery

If you've been following along with our decorating adventures, it will not surprise you to know that we put up another photo gallery. (If you're new to our blog, check out our anniversary, mini, great room, growing up, visual guest book, and we do galleries).

Our newest gallery is our Heritage gallery. Our immediate family is spread out across America and in the Netherlands. We wanted to have an easy way to keep our family's faces familiar to our son, so this gallery is right outside his bedroom door. 

For perspective, this new gallery is in the same hallway as the growing up gallery. 

Here's a little before and after comparison.

Once again, we used Ikea Ribba Shelves for this gallery. We LOVE these shelves. If Ikea was closer, we'd really be in trouble. We've also used them for:


For this project, we used four 45-1/4"shelves to make the two long shelves. We really like the flexibility photo shelves offer for photos that may change around. I had a hard time narrowing down the photos, and we don't even have room for our siblings...yet!
I used a mix for black and white 5x7 and 8x10 frames, with two additional square frames. I would have preferred all black frames, but the store was out of black. Here's a closer look.

Here's a closer look at some of my favorites. This first one was taken in Amsterdam on the day that Niels asked my dad for his blessing. After the big question, we all took a boat tour of the city. I love how our dads are looking at each other like they are celebrating that they finally are getting their kids married off. 

I've only recently found this photo of my mom and I from when I was about three months old. I made the mat out of scrapbook paper and affixed the photo with washi tape. Also, I bought the frame for $2 at a thrift shop and spray painted it from bright blue to black.  

The last time I was in my Gramma's house, she had been put in the hospital and I had a feeling it would be the last time I would ever be in her home. I spent several hours looking through her photo albums and just fell in love with this one. It is such a great representation of who she is. I think this could have been a Minnesota postcard in the 50s. Mom gave me the photo for Christmas this year. 

One of my favorite photos from our wedding is this photo of our parents and siblings.

My dad is Santa Claus! When D was just a few days old, Santa Dad came to meet him. He brought his Santa suit and took my favorite photo of him with D. 

This is my absolute favorite photo of my absolute favorite Dutchie. I need to ask his mom, but I think Niels is three in this picture. 

And this is my absolute favorite baby photo of our little Dutch boy. D was four months old and he was wearing a super cute bunny outfit for his first Easter. 

These two photos both include my mom's dad. I love the picture on the left because I make that same face, and so does our son. The photo on the right is their wedding photo.

Our son is the first born son, of the first born son, of the first born son. This three generation photo was taken on D's second trip to Holland. 

The small photo is a picture of D with his overgrootmoeder, Niels' Oma. She is 84, living in the Netherlands, so we never take our time with her for granted. And it's another thrift store frame that I repainted. The photo on the right is Niels' mom and dad on our wedding day. 

One last view of the gallery from our bedroom shows the wedding frame on the short wall outside our door. We had our wedding invite and vows matted and we used it for the guest book at our wedding. I love that it's the first thing we see when we step outside our bedroom. 

I keep thinking we are about done with galleries, but then I think of more. I still have plans for a gallery of printables in D's room, and a build gallery with photos like this from the day we broke ground.

Do you have a photo gallery in your house? Post a link below if you'd like to share. You can also see more of my gallery inspiration on Pinterest.

Linked to:
Alderberry Hill * Blissful & Domestic * Clean & Scentsible * The Grant Life * Happy Hour Projects * Home Stories from A to ZHouse of Hepworths  * I Heart Naptime * It's OverflowingMade in a Day *  Miss InformationMy Uncommon Slice of Suburbia Nifty Thrifty Things * A Night Owl * Serenity NowShabby Creek Cottage  * Shabby Nest * Simply Designing * Sumo's Sweet Stuff (featured) * That's What Che Said * DIY Dreamer * Bowl Full of Lemons * Kurtz Corner * New Nostalgia * Crystal & Co  * We Are That Family * Rainbows & Honeysuckles * The Dedicated House * Happy Go Lucky * Capturing Joy  * Thrifty Decor Chick
Related Posts Plugin for WordPress, Blogger...