***Updated June 29, 2016***
Since first sharing this post 3 years ago, I have made several changes to my craft room, but my table has stayed the same. Since there has been renewed interest in my table, I thought it would be a good time to share a full craft room tour.
In the weeks before our exchange student, Marissa, headed back to her Dutch parents, I found myself thinking about how sad it would be to walk by her empty room every time I went up and down the hallway. In situations when I'm dealing with grief of some sort, I find it helpful to give myself something to look forward to doing. (After our second miscarriage, we planned an Alaskan cruise for our due date).
My sewing experiment has quickly become a sewing passion so I decided that her room would make a great craft room. At the time, I had bins of fabric stacked up in the dining room, and part of prepping for dinner was clearing off whatever project I was immersed in that day. And if company came over, it had to be moved upstairs to our room, like this.

One year ago, when Marissa arrived, her room looked like this:

Not quite ready for quilting! Marissa left on a Thursday, and housekeeper (who comes every other week) was coming the next morning. I really wanted her to be able to deep clean in there. After all, a teenager was living there for a year! (Marissa was actually pretty neat and very respectful of her room).
I did a little bit of brain storming before Marissa left. My original idea was to use Ikea Lack tables, like Brooke from Custom Style. I also saw lots of ideas like what Stef from The Girl Inspired did with a table top over to cubby shelves. I knew I would be standing at the table, so I didn't want to lose the storage space. Finally, I saw an Ikea Hack table using Expedits. It still had space underneath it, but it got me excited. Then I found this Hack using two 4x2 Expedits and I was inspired. (By the way, how cool is using a Ribba shelf for a pencil holder?
After we dropped Marissa off at the airport, we consoled ourselves with our Ikea trip. And when we got home late that night, we took nearly every last thing out of her room. This would have been a great time to replace the carpet with cork, but that we will save that for another day.

The next day, Niels set to work on putting together the Expedits. We bought two 4x2s (currently $69/each) and two 2x2s (currently $39 each) because I wanted the storage on each end. We realized when we started putting it together that we bought glossy white 4x2 and regular 2x2s. Bummer, not only because the glossy is more expensive, but it also shows chips and scratches easier--things that are prone to happen when you are working with scissors, rotary cutters, and seam rippers! However, Ikea is more than hours to our nearest Ikea, we decided to keep it.

Since we'd be making a racket across the hall, D got to stay up late and watch the progress. He thought the Expedit made an excellent mini book nook.

If you're going to travel more than two hours and have to rent a bigger vehicle to buy furniture, it's generally recommended that you know the dimensions of the room. We didn't. We love Expedits and will probably continue to add to our collection as we finish our basement, so I knew I could put them to good use somewhere else if they didn't work in the craft room.
First two Expedits done.

So we put the first 2x2 on the end and realized we wouldn't have room for the other one.

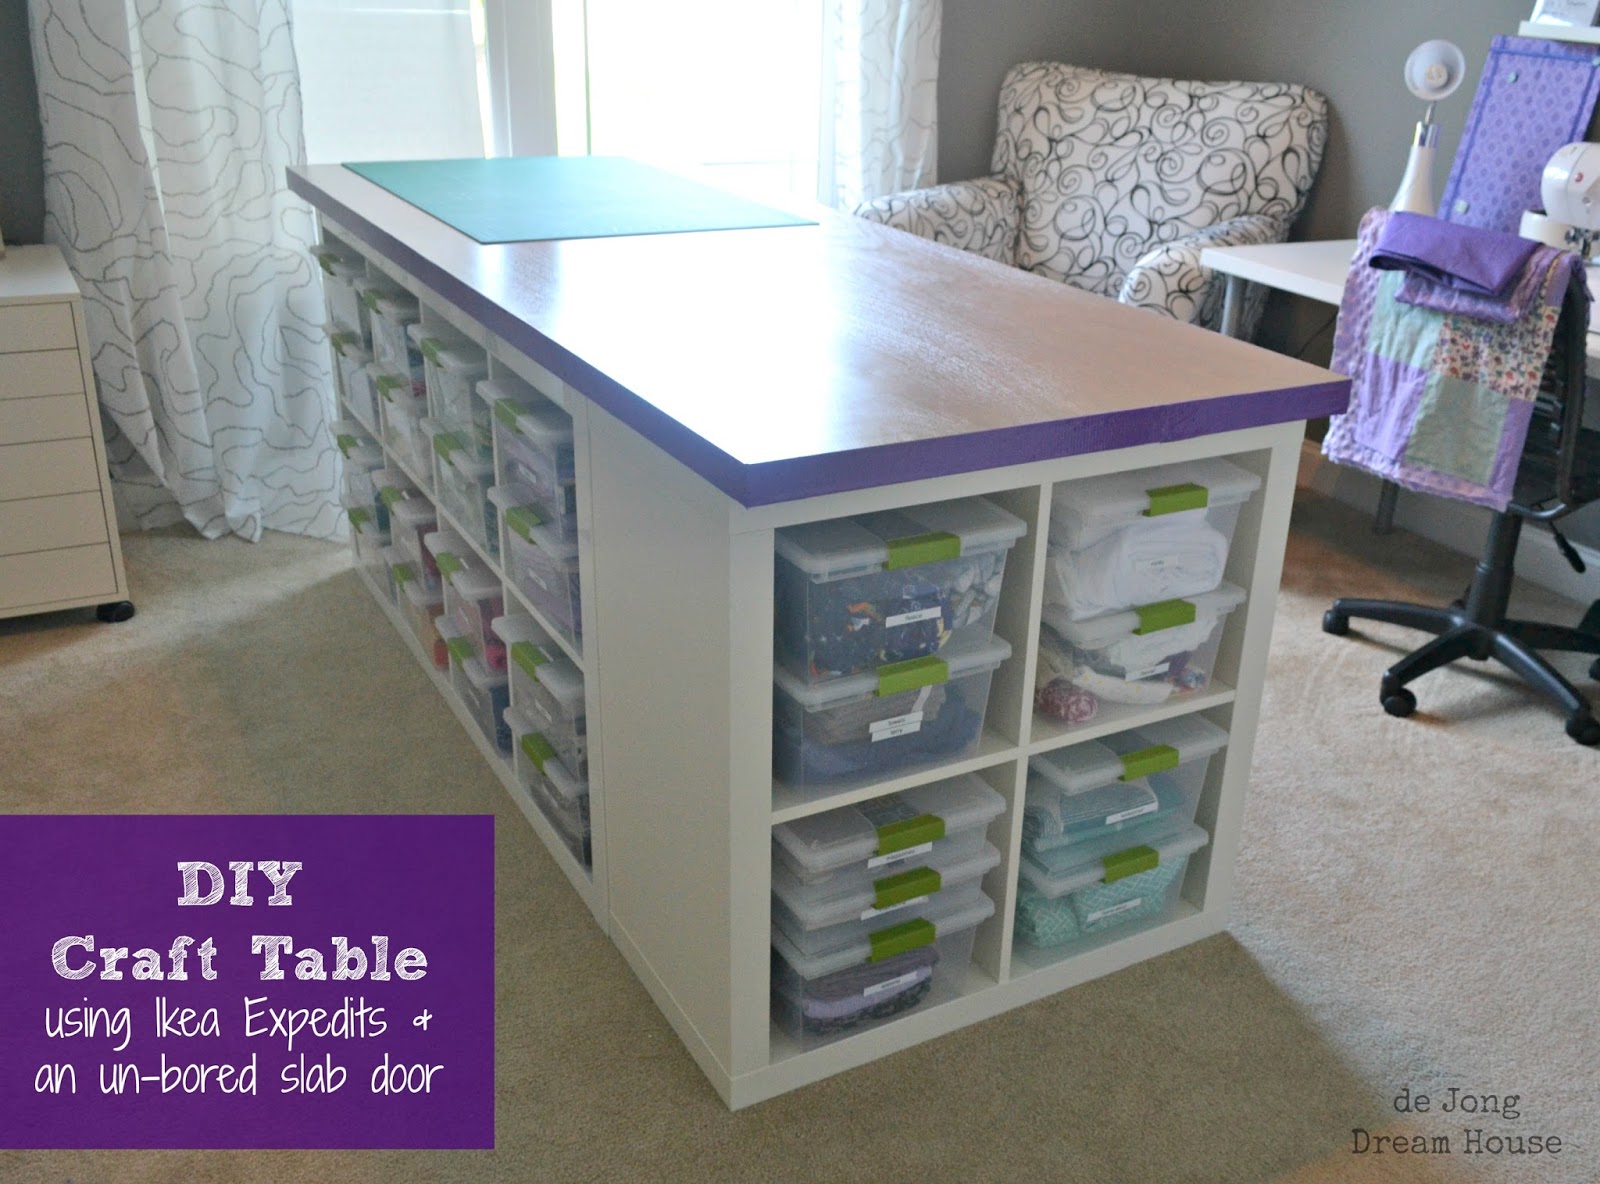
I knew I was going to use some of the Sterilite clip boxes (<---Amazon affiliate ad) I used in my pantry. I can stack two perfectly in one of the Expedit cubbies, which means there is lots of room to built my fabric stash!

Originally, we bought casters at Ikea to make the table a tad higher, but I realized I wanted a table top for a uniform flat surface instead. (I'm short, so I couldn't have both). I really had my heart set on butcher block, but I vastly underestimated the cost. I did find two reasonable options at Ikea and Menards, but they didn't come in a size large enough to cover the table.
It took me a few weeks to figure out a solution. I was walking up and down the aisles at Home Depot looking for inspiration when I saw an unfinished, un-bored door (just the slab, no frame, no hole). We opted for the solid core door so that it would stay on the Expedits better. Only $59
As we wheeled the door to the register, we say this teeny tiny little chip on the edge. I asked if we could get a discount, and we were able to get the door for $45. Score!

Niels helped me pick out the gray stain, and it's perfect: Varathane Sun Bleached Stain + Poly.

It was my first time staining wood, so I was a little nervous. But five coats later, I had a pretty gray door table top.

I love how it turned out!

And I have a craft table!

I probably did something wrong, but I couldn't figure out how to get the edge to take to the stain. I had the idea of trimming it with this super cool purply-gray metallic ribbon, but it was catching on fabric so it had to go. (Don't mind the purple masking tape on the walls marking where I want to put things!)

Plan B was good ol' fashioned duct tape. In my favorite color, purple.

Tour of the final craft table. This side is where I store my fabric stash. Soon I'll show you how I organize my scraps on the wall side.

It's a little scary how addicting it is to build your fabric stash!

The end unit holds my non-cotton fabric, like minky, fleece, flannel, terry, etc.

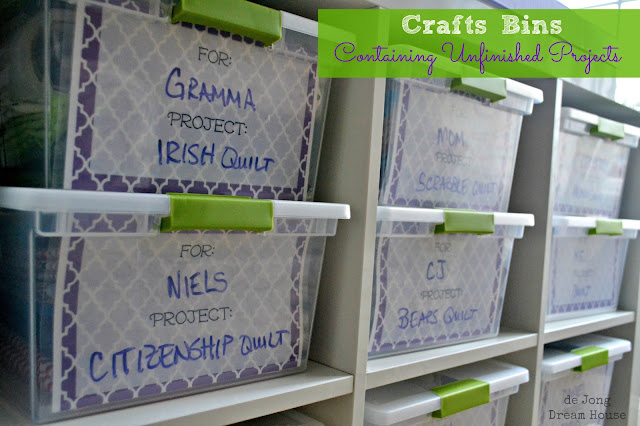
The other side has my project bins. You can see how I use index cards to note the recipient and type of project. You can also see that I have room for one more bin!

At the far cubby, I have my rulers and smaller bins with scissors, tape, pins, etc.

Finally, on the flat short side, I used Command Hooks to hang my rotary cutter, scissor, and rag quilt snipper. (<-- Amazon affiliate link)

Now I get back to quilting!
Updated: I'm made some pretty re-usable project labels!
Linked to:
30 Homemade Days * The 36th Avenue * Balancing Home * A Blossoming Life * Bowl Full of Lemons * Cherished Bliss * Charlie Beth * Craft-O-Maniac * Create Craft Love * Crystal & Co. * The CSI Project * Diana Rambles * DIY Dreamer * DIY Showoff * Ellison Lane * Feeding Big * Fluster Buster * Glitter, Glue & Paint * Grace Langdon * The Grant Life * House of Hepworths * It's Overflowing * Just Us Four * Keep It Simple Crafts * Kitchen Table Art * Krafty Kards, Etc. * Life After Laundry * A Little Clarification * Liz Marie Blog * Memories By the Mile * Mums Make Lists * My Uncommon Slice of Suburbia * Naptime Creations * New Nostalgia * Nifty Thrifty Things * Not Just a Housewife * Org Junkie * Organizing Made Fun * Practically Functional * Real Coake * Remodelaholic * Remodelaholic (turning tables diy week)Serenity Now * Sew Can Do * Sew Many Ways * Sew Much Crafting * And Sew We Craft * Sparkles & A Stove * Tatertots & Jello * That's What Che Said * This Silly Girl's Life * Threading My Way * Thrifty Decor Chick * Tossed Salad Life * Tumbleweed Contessa * Uncommon Designs * VMG206 * Who Needs a Cape * Will Cook for Smiles
http://www.dejongdreamhouse.com/2016/06/my-new-improved-craft-room.html


What an absolutely fabulous quilting room - I don't say "work" you notice: this would have been a dream place for me when I was quilting nearly 10 years ago. Had the space then, not now though, and quilting is a no-no, as my hands and fingers could not cope now with the full weight of a biggie. Toys are much more manageable!
ReplyDeleteWishing you hours of happy endeavour - and many sales as a result. Happy makers usually have happy sales results!
Isobel: www.ColdhamCuddliescalling.blogspot.com
Wow! That's an amazing crafting space.
ReplyDeleteThe command hooks for the rotary cutter are brilliant. I'm constantly having to search for mine under piles of fabric. And, thanks for the tip too about the Sterilite boxes fit perfectly into the cubes. What a great idea to assign a project to each one.
ReplyDeleteI'm glad you found the duct tape solution for the edge. If you would ever need to change it out in the future, you can find rolls of thin iron on veneer at hardware stores. You iron it on and then you can stain it to match your project. It came in handy on some plywood shelves that I had in my kitchen.
Thanks for the tip about the veneer! I had no idea.
DeleteDid you permanently attach the door?
DeleteEverything looks SO lovely, Jen! You are an organizing wizard...and I'm pinning this post, so I can refer to it when we buy a home with an extra room that I can comandeer as a craft room. And you know I'm a huge fan of the IKEA Expedits! ;-) (My favorite part is the purple duct tape around the edges.) Brava!
ReplyDeleteWarmly,
Lauren
The Thinking Closet
Everything looks SO lovely, Jen! You are an organizing wizard...and I'm pinning this post, so I can refer to it when we buy a home with an extra room that I can comandeer as a craft room. And you know I'm a huge fan of the IKEA Expedits! ;-) (My favorite part is the purple duct tape around the edges.) Brava!
ReplyDeleteWarmly,
Lauren
The Thinking Closet
One day, I know I'll have a craft room! and when I do, I'm going to follow this to make my own craft table :) I'm pinning this right away. Everything looks really good Jen. Thanks for sharing this great project at the Less Laundry, More Linking party.
ReplyDeleteI love your new craft table! I have been looking around for inspiration for my craft room that has been over taken. I can't wait till we get to take a trip to Ikea so I can redo my room :)
ReplyDeleteI'm in love with your craft room. The room itself is inspiring.
ReplyDeleteOH MY! I love this! I've been stalking Craigslist hoping to find a cheap ($30) dining type table to convert into a cutting/craft table for my sewing studio. I wish I had a bigger budget to make this instead. We have an Ikea within 20 minutes of us.
ReplyDeleteI'm jealous you are so close to Ikea! You can always stalk CL for Expedits or even Ikea's clearance section. You could also buy in part. Either 2 2x2s with a top, or just the 2 4x2s with a cutting mat as a top for now. Good luck!
DeleteOh, how I love these big tables made from Expedits! Looks awesome!
ReplyDeleteSomeday I need to have on of these. :)
Love, Midsommarflicka
What a great room and so much storage space. It's nice that the room has a history of housing your exchange student, but I know you will enjoy it this way. Great job!
ReplyDeleteMe too. I love knowing that Marissa spent so much time in there. Makes me miss here just a little less.
DeleteThat is an awesome table! Isn't funny how large a room looks, until you try and move the furniture in :) I have even tried measuring before I go, and I still manage to get it wrong.
ReplyDeletelol...Glad I'm in good company!
DeleteHi Jen
ReplyDeleteI absolutely love you new craft station. I wish I had one like it.
I have 2 blog hops going today please come over and share this post with both hops. Everyone will want one! I'm also now following you on Bloglovin Hope you will join us.
Angel @ sewcraftyangel.blogspot.com
Your craft table looks amazing! I like the idea of sorting the projects in the bins. Thank you for sharing!
ReplyDeleteWOW I love love loooove this! I totally want to do this but find a good surface for some food photography on top, and I'd use the cubbies for food props. Great post with the step by step photos!
ReplyDeleteWOW I love love loooove this! I totally want to do this but find a good surface for some food photography on top, and I'd use the cubbies for food props. Great post with the step by step photos!
ReplyDeleteHi Niels and Jen! Thank you so much for sharing this absolutely awesome craft table at Best of the Weekend - just wanted to stop by to let you know that this great project will be one of my features at tomorrow's party. I'm so happy that you joined the party and hope you have a great Friday!
ReplyDeleteWow, that is one AWESOME table!! I want one of these :)
ReplyDeleteWow, it turned out great! You are definitely fast at building that stash!
ReplyDeleteLook at all that storage!!! Impressive :)
ReplyDeleteGreat table! I love all the storage space!
ReplyDeleteWow--great way to use the Expedits! What a wonderful table!
ReplyDeleteWow--what a great way to use the Expedits! Congratulations on your wonderful table!
ReplyDeleteThis is totally perfect! I'm drooling over here! I don't currently have a craft space, but I'm pinning this for when I do. The fabric storage is just perfect. I've found that having clear containers is the best way to keep craft "stuff" corralled.
ReplyDeleteWow, that table is amazing! I just did something similar with a solid core door and a few cube storage shelves, but it doesn't have nearly the storage space that yours does! Love it! In case you didn't see it earlier, I featured this on my blog today! I'm stopping by to pin, and to let you know you can grab a Featured button if you don't already have one! http://practicallyfunctional.com/decorate-and-organize-your-home/
ReplyDeleteThis is so awesome. I've been contemplating walking away from two work spaces on opposite sides of my craft room, and creating one central workspace. What are the dimensions of this table?
ReplyDeleteThe table top is the same size as the table top, 32" x 80".
DeleteYour table is really really great and I love the purple tape solution.
ReplyDeleteI love when the cheap solution is the best solution!
DeleteFabulous! I am super jealous!! Someday I'll get a craft room back.
ReplyDeleteLove your craft room table! What a nice large space to sew and create! I featured this on Sew Woodsy today!
ReplyDeleteThank you so much!
DeleteWhat a creative, clever and oh so practical way to use Expedit shelving!!!
ReplyDeleteI've featured your craft table today...
Deletehttp://www.threadingmyway.com/2013/08/threading-your-way-features_25.html
Which size are the boxes?? There are several sizes listed on the Amazon site. Great idea!! I plan on doing the same....thanks for the inspiration!!
ReplyDeleteI used the Deep Clip boxes (pictured here: http://www.amazon.com/dp/B004QJM0DG/ref=as_li_ss_til?tag=dejondrehou-20&camp=0&creative=0&linkCode=as4&creativeASIN=B004QJM0DG&adid=1S5M1YQYGCW5V0GCNAEJ). The Amazon price is the best for 4. I have also seen them for $5 each at Dollar General and $6 each at Target. I'd love to see your finished table when it's ready!
DeleteSew nice and neat! enJOYed.
ReplyDeleteWow!! That's some amazing storage! Gotta say, I'm a bit jealous! Well done! :)
ReplyDeleteI need this in my craft room!! I wonder if the hubs would go for it??? Coming over from the round-up at Wait Til Your Father Gets Home!
ReplyDeleteCindy @ Crazylou
I love your craft room! It's so pretty and organized.
ReplyDeleteHi Jen! This is fabulous!!! It is so organised and gorgeous!!!
ReplyDeleteWould you mind if I featured this on And Sew We Craft (www.andsewwecraft.com) this week? I have serious craft room envy at the moment :P
Amy x
Hi Amy,
ReplyDeleteYes, please, feature away! And thank you!
I am so jealous of that craft table! If only I had the room for that beautiful thing! Found your blog on the block party. If you like to link up come over to Craft Frenzy Friday at www.craftdictator.com! I hope to see you there!
ReplyDeleteJust wondering how did you secure the table?
ReplyDeleteI just put the door over the Expedits. It's not secured with brackets, although we could have picked up some of those at Ikea. The door slides a little bit if I lean against it, but I actually like having the option of having it flush or hanging over depending on what I'm working on. If I had the unit on casters, I would secure the table with brackets and bolts.
DeleteJen....I have craft room envy!!! Love, Love, Love your craft room. Thanks for sharing at Throwback Thursday.
ReplyDeletexoxo
Denyse
Wow, LUV your craft table creation, Jen. I put something similar together but it doesn't look nearly as professional or organized as your beautiful setup. ;-)
ReplyDeleteDo you have a photo of your craft table on your blog? I'd love to see!
DeleteI LOVE LOVE LOVE the Expedits and have several formulations...and this post just gave me wonderful inspiration! I love that now I know which plastic bin to buy! Thank you so much for an awesome inspiratino post. I found your blog from Beneath my Heart.
ReplyDeleteThis is such a great idea! Thanks for sharing!
ReplyDeleteDarcy
This is wonderful!! The only thing I would do different is add wheels. I will have do see it they ship. :)
ReplyDeleteIkea does sell casters for the Expedit (http://www.ikea.com/us/en/catalog/products/S19903848/). I'm short though, so I didn't want the extra height!
DeleteWhat a great table. What did you use to attached the door/table top to the Expedits?
ReplyDeleteGreat Table. I am looking forward to making one for my wife. What did you use to connect the table top to the Expedits?
ReplyDeleteYou are going to have a happy wife! I just have the door sitting on top of the Expedits. It slides if I press against it, but otherwise stays stable. This works for me because sometimes I want a flush edge, and sometimes I want the overhang. If you want to secure it, you could use bolts or brackets. I think you could also put a rug protector over the Expedits and under the door to prevent slipping.
DeleteThis is amazing, amazing, amazing! I soooo wish I had more room for something like this! It would make my crafting life so much easier.
ReplyDeletexoxo
You guys did a great job putting this craft island together! Those sterilite boxes looked so huge I thought those couldn't possibly be Expedit shelves. Hopefully you can find them on sale at JoAnn's etc. What a wonderful, supportive husband you have! Congratulations on a job well done and all that hard work!
ReplyDeleteI love, love, love this idea. I saw in an earlier comment the tabletop isn't secure. Do you secure the Expedit units together or are they heavy enough to stay put without being secured together? I would need Ikea to ship them to me as the closest one is in Atlanta and I live in Nashville. Rumors have been around for a couple of years Ikea would be coming to Green Hills Mall but it hasn't materialized yet.
ReplyDeleteThanks! I don't have anything secured. I wanted to freedom to move everything around if I wanted. Of course, I love this set up, so I haven't. You could use brackets to secure the Expedits together, but I find that the weight of the door keeps them in place. If you put casters on the bottom, I would use brackets to keep them secure. As far as the top, I like being able to shift it. Sometimes I want a flush edge, and sometimes I like the slight overhang. You could uses bolts to secure it down, or even a rug grip would work, I imagine. (By the way, I love Nashville. I used to go there several times a year for work. I haven't been back in way too long. Great city!)
DeleteOH, WORD!!! I am making this for my laboratory!!!!
ReplyDeleteOh it's fantastic - I am very jealous, I would love to have the space. Thanks so much for sharing at #EmptyYourArchive Alice @ Mums Make Lists
ReplyDeleteWhat is the height of the table?
ReplyDeleteWith the top, it's 36"
DeleteWhat a beautifully organized workspace! Great idea to use the door.
ReplyDeleteI have 2 of the 2x4 Expedits that are side by side length wise, so it appears to be a pony wall separating my crafting area from the kitchen. Once I move into my official craft room, I will probably go with this idea you have!! GREAT thinking about the door as a table top.
ReplyDeleteI think I would put some rubber sticky 'bumpers' on the shelf tops to keep the table top from moving so easily. I did that with some glass for my craft desk.
How do you keep the table on the shelves?
ReplyDeleteMine is screwed from underneath. I had to use Kallex...no more Expedits...
DeleteNo more Expedits...size is slightly smaller in width...they are only 30 inches so to get it to 36 I need legs even with a door that is 1 1/2 inches thick.
DeleteDo the bins stick off the edge of the Expedit? I'm trying to find some bins for mine and these look great, but is it weird that they stick off the edge?
ReplyDeleteDid you get an answer?
DeleteThat is an awesome table! Isn't funny how large a room looks, until you try and move the furniture in :) I have even tried measuring before I go, and I still manage to get it wrong.
ReplyDeleteنقل عفش بالرياض
كشف تسربات المياه بالرياض
شركة عزل مائى بالرياض
نقل عفش بجدة
نقل عفش مكة
تنظيف مساجد بجدة
شركة الأحمدي لنقل الأثاث
شركة عزل خزانات
شركات مكافحة حشرات
شركة كشف تسربات بالرياض
شركات العزل الحراري
شركة عزل مائي
شركة القمة لمكافحة الفئران والقوارض
مكافحة البق
شركات مكافحة النمل الابيض
شركة كشف تسربات المياه ومعالجتها
شركة كشف تسربات بالرياض
نقل اثاث
Where did you get the plastic bins (with green handles). Those seem to fit perfectly.
ReplyDeleteThey do! They are Sterilite Deep Clip Boxes. They have changed the color from green to turquoise. (If you don't like that color, wait a year or two and they'll change it again!) Here's a link to them on Amazon: http://www.amazon.com/Sterilite-Deep-Clip-Box-Pack/dp/B004QJM0DG/ref=as_sl_pc_ss_til?tag=dejondrehou-20&linkCode=w01&linkId=MXMVC77LGQYLFG2T&creativeASIN=B004QJM0DG, but you can also find them at Target, Dollar General, and other stores.
DeleteHow did I not find this post until now? This is so awesome.
ReplyDeletelol. I love this table!
DeleteThank you so much for this idea. I just finished my version. Mine is on wheels as my room is small and I have to be able to move it around. It is about 36.5 inches high. It is so nice not to have to bend over cutting fabric! Thank you again!
ReplyDeleteWonderful! I'd love to see a picture! Happy creating!!
DeleteGreat job! Love your craft room! I have used iron on veneer edging. You can get it in different widths and replace the purple duct tape... it will start shifting with use and become gooey at the edges.
ReplyDeleteI glued measuring tapes to the side of mine. One with metric, two that are just inches and one that starts with the number one in the center and counts up each way.
ReplyDeletelove, love, love!!!
ReplyDeleteMy husband is heading to IKEA for me on his next business trip out of town. They don't sell the expedits anymore but they do sell the Kallsx series. I am hoping it will work just as well. I love this idea and want it for my craftroom.
ReplyDeleteInspired by your beautiful table we built just 2 Kallax units for the end supports(http://www.ikea.com/us/en/catalog/products/40275813/, added casters (http://www.ikea.com/us/en/catalog/products/00288657/), finished with an IKEA Galant table top measuring about 63" x 32". The table top was secured by cutting pieces of PVC window molding bought at the hardware store(http://www.lowes.com/pd_250273-1487-02330___?Ntt=0.625-in+x+8-ft+interior%2Fexterior+pvc+stop+window+moulding&UserSearch=0.625-in+x+8-ft+interior%2Fexterior+pvc+stop+window+moulding&productId=3340498)which were screwed to the underside of the table so they surround the top of each Kallax unit. The table is movable due to the casters and the top is secure when in use but easily removed to stand against a wall or closet which allows for additional room space should we desire it. I found storage bins that fit the 'cubes' at Walmart (Homz 15.5-Qt Latching Clear Storage Boxes, Set of 4). Thanks so much, Jen, for your helpful post!! Kimberly
ReplyDeleteInspired by your beautiful table we built just 2 Kallax units for the end supports(http://www.ikea.com/us/en/catalog/products/40275813/, added casters (http://www.ikea.com/us/en/catalog/products/00288657/), finished with an IKEA Galant table top measuring about 63" x 32". The table top was secured by cutting pieces of PVC window molding bought at the hardware store(http://www.lowes.com/pd_250273-1487-02330___?Ntt=0.625-in+x+8-ft+interior%2Fexterior+pvc+stop+window+moulding&UserSearch=0.625-in+x+8-ft+interior%2Fexterior+pvc+stop+window+moulding&productId=3340498)which were screwed to the underside of the table so they surround the top of each Kallax unit. The table is movable due to the casters and the top is secure when in use but easily removed to stand against a wall or closet which allows for additional room space should we desire it. I found storage bins that fit the 'cubes' at Walmart (Homz 15.5-Qt Latching Clear Storage Boxes, Set of 4). Thanks so much for your helpful post!!
ReplyDeleteKimberly, that sounds awesome! I'm glad you were able to adjust my plans to work for you!
ReplyDeleteThat's an awesome craft table, I already have couple of 4X2 Expedits which we don't need anymore. Just found your post right in time. I am going to turn them to the craft table for my basement. My daughter is into Acrylic painting and polymer clay jewellery making.
ReplyDeleteI just had one question for you - did you screw the table top(door)to the shelfs or just placed it on top of the shelfs?
I believe the article said she didn't. I made my version of this and I did screw a top to mine. I used plywood. I sew and this is my cutting table. :) This idea is wonderful.
ReplyDeleteAwesome! Thanks for sharing!
ReplyDeleteHi, I love your idea and would love to make it for myself. I have a couple of questions. I might have missed that part in your directions but how did you hold the sections together? Also còuld you give me the finished height? I want a cutting table but I’m 5’7” tall and want to make sure it’s high enough for me. I was thinking of putting wheels to be able to move it around if needed.
ReplyDeleteI don't have anything holding the sections together. There's enough weight with solid door and bins on the shelves that nothing moves. That said, I'm only 5'4" so you may want a little more height. I've had lots of people tell me they put theirs on casters, which would work great for your height. You may need some brackets to hold the shelves together if you want it to be mobile. I'd love to see a picture if you make one!
DeleteI have mine on legs from Ikea.
DeleteYour end piece that is 4 x 4...does it overhang slightly beyond the 2 x 4 shelves? Mine does...for some reason. I found a door too...and it is only $37. at Home Depot. Mine will be 36 inches wide so it will overhang for me to sit a little easier. Not perfect...really wanted a 9 inch overhang but still good. I am raising mine on legs too so it is bar height. It is for scrapbooking and I want to have it higher to make cutting easier. I already have this type of thing in the sewing room with two of the 2 x 4 units only. I already had the counter top...bought for my cabinets that got flooded before they were installed. : ( Thanks for showing others.
ReplyDeleteOh, and how did you hold the sections together...mine are screwed together. I have my scrapbooks under in the spaces...can't have them ruined.
What a great craft table project Jen! It takes a craft to make a craft. :)
ReplyDeleteIf your looking for something to brighten up your desk at night check out our lamps.
If your interested in collaborating on something let me know!