Monday, November 12, 2012

Growing Up Gallery

This weekend I put up a new gallery and I am just tickled with how it turned out.

It started last week when I got our son's first preschool photo.


I was trying to think of the best way to display his photo (and the photos to follow over the next fourteen years). I found inspiration in our anniversary gallery. We have frames celebrating various milestones from engagement to our 45th wedding anniversary. We hung up all the frames at once, putting labels to mark future milestones.

So I bought some inexpensive 8x10 frames from the Flower Factory--only $2.55 each! Then I played around in Word to make labels with the grade and year from preschool (our son has one more year) to twelfth grade. 

I had some clear labels, but decided I liked the white ones better. I glued each one onto a green notecard.

Next, I went through my stacks of scrap paper and pulled out 14 different pages. I love that this project cost nothing other than the frames! I lined up the papers and played around with the order. My vision isn't great to see the gradient colors, but it works for me.

Next I cut out 8x10s of each page, using the glass from one of the frames as a template.

First one done.

And framed.

Each September, I do a little interview with D, similar to this one. My next project is to make pretty version for each grade and stick them in the back of the frames as a prompt to do the interview each year when I put the new photo in the frame.

Updated: 
I found these super cute interview printables from Precious Announcements on Pinterest.
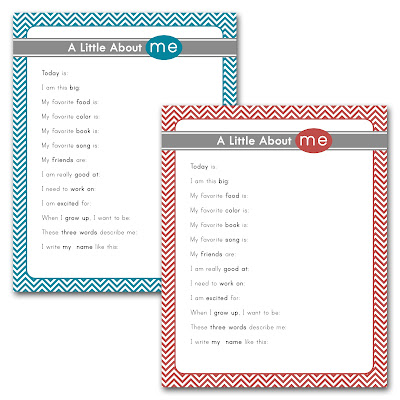
Then I brought all the finished inserts and frames up to the empty wall.

I still had four empty frames, so I put in a photo from his birth day, and then fall photos from each year til now.

When I laid them all out, I realized that even though my receipt said I bought 20 frames, I only had 19.

The last photo is one I had forgotten was taken. (It was a very sentimental night going through all these photos!) It was a few weeks before D was born. I was sitting in the nursery with our dog when D kicked me. Bailey had her paw on my tummy. D's kick startled her so she licked my belly. Such a sweet moment with a sweet dog. We lost Bailey twenty months ago.

I really liked how bright and colorful the frames looked.

By this time it was pretty late. My original thought was to hang the frames in a large square. Something like this: 

Niels didn't like the idea of the photos being so close to the floor, and since I needed his help to put them up, I decided to sleep on it.

At about 3am, inspiration struck. Knowing that I couldn't rely on my brain to remember it in the morning, I drew it up on PowerPoint.  

When I woke up, I pulled the frames out of the hallway to see how it looked with frames. I loved it. And, so did Niels!

I was still missing a frame, so first we had to make another trip to Flower Factory.

Finally, we were ready to get started! Here is the before photo. It's the space just at the top of the stairs.  On the other side, going up the stairs, is our anniversary wall.

To start, I put a long strip of masking tape on the wall to mark the line on which I wanted the end photos to sit.

It took a few tries to get it exactly level all the way across.

I measured the wall and was quite relieved to see that I have 5" to spare.

I marked 2.5" out from the linen closet frame to start with the 12th grade frame. I figured it I got off a little, at least I could go out above the stairs.

Earlier in the afternoon, I decided that I would try the Command Hook picture hangers instead of nails. It turned out to be a fantastic decision. First of all, the odds of making a bajillion extra holes when the frames had to fit exactly together was high. Secondly, this allowed me to finish a project by myself.

The command strips were super easy to use. (This is no ad. Sadly, I don't yet know enough about blogging to make any money here. Although, if someone wants to educate me, I'm an eager learner!) First, I put two pieces of velcro together and pushed down.

Then I removed one piece of protective paper so the sticky part was revealed.

For the first frame, I put two strips on either side of the top of the frame. For the rest, I put one strip on top and one on the bottom.

After I removed the top strip, I was ready to hang the frame.

As soon as I found the exact place I wanted, all I had to do was push down.

For the first frame, I did not remove the stand.

But the frame was a little uneven against the wall, so I took it down and removed it. Along with the other 19.

Next, I found the midpoint of the frame so I knew where to place the next column.

The frames went up really fast.

And when I got to the last frame, I was thrilled to see that it was still level!

I finished just before our little guy went to bed. He loves his new gallery.

I can't express how happy it makes me to have photos of my family up. And just as I love having a visual way to see the years ahead in our marriage, this gallery reminds me to savor every short moment I'll have with my little boy. He'll be leaving the nest before I know it.

He's not even four and we're six frames in!

The view coming up the stairs.

I find beauty in order.

A few artsy shots by my hubby:


Bliss.

Updated: In case you missed our other galleries, here are the links:
  1. Great Room Great Memories Gallery
  2. Mini-Great Room Gallery
  3. Anniversary Gallery
  4. Heritage Gallery
  5. We Do Gallery
  6. Visual Guest Book Gallery
  7. Boy's Room Printable Galley
Updated: 
It's been nearly three years since I first put up the growing up gallery. Here's an updated picture. I can't believe I'll be putting up his first grade picture this year!


Do you have photo galleries in your home? Link them up below!

Linked to:
36th AvenueAt the Picket Fence * Balancing HomeBetween Naps on the Porch * Capturing Joy * Craft-o-Matic * Create Craft LoveCreative Muster * Crystal & Co (featured) * The CSI Project * Diana RamblesFolk * Glitter, Glue & PaintThe Grant Life Home Stories A to Z * Hope StudiosHouse of Hepworths * I Heart Naptime * It's Overflowing * Just Us FourLife After Laundry * Little Miss Celebration * Liz Marie BlogMiss Information * Mums Make List * My Life According to Pinterest *  My Uncommon Slice of Suburbia * New NostalgiaNot Just a Housewife * Organize Your Stuff Now * Organizing Made Fun Practically Functional * Real CoakeSerenity Now * Sew Much Crafting *   Sparkles & a Stove * And Sew We CraftSugar Bee Crafts * This Silly Girl's Life * Tatertots & JelloThrifty Nifty Things * Tossed Salad Life * Uncommon DesignsWho Needs a CapeWill Cook for Smiles

Visit thecsiproject.com It's Overflowing

Friday, November 9, 2012

Because I Live With Boys...

I love my boys. But I really can't stand looking at an open toilet. I get kind of skeeved out by the idea of all the stuff swirling around in the air after you flush. (Even though we have a water closet in our new master bathroom and a door between toilet and rest of the bath in the family bath, I still keep toothbrushes in drawers.) So, I had an idea. 

Eventually I am going to give up trying to win a Silhouette Cameo from one of my favorite blogs, and will break down and buy one. In the meantime, I really like the foam letter stickers from Thickers for projects like this. They are easy to adjust if  when letters are applied unevenly.

And sometimes, I use the Sticko flat letter stickers when I want to label something small like a tote tag, or the buttons on our dual flush toilets. I labeled all four toilets when we moved into the new house, mainly for our newly-potty-trained boy, but it's been very helpful for our guests, too. 


My little boy is actually better about remembering to put the lid down than my big boy. But since my hubby is nearly perfect, I let it pass.

Linked to:
At the Picket Fence
Between Naps on the Porch
Home Stories from A to Z
House of Hepworths
I love naptime
It's overflowing
Miss Information (Featured)
Mums Make Lists
My Uncommon Slice of Suburbia
Thrifty Nifty Things

Miss Information

Tuesday, November 6, 2012

Wool Dryer Balls

Whew! We've been busy! As Niels mentioned in the previous post, we just opened up our home this past weekend for our builder's fall tour. There's nothing like knowing a bunch of people will be walking around your home to motivate you to complete projects and cut through clutter! I have grand plans to update the house tour and show you what's been keeping us busy (other than an energetic three-year-old and very social seventeen-year-old). 

I'll kick things off with my latest green clean project: Wool dryer balls!

A friend told me about these as an earth-friendly alternative to dryer sheets. In addition to making clothes cozy and soft without the yucky chemicals, they are also known to reduce drying time, which saves money. We haven't used dryer sheets for several years, but I'm curious to see how well they help with our drying time. They don't cut down on static, but since we started using 1/2 cup vinegar in each wash load, that's been a non-issue for us. 

You can buy wool dryer balls on etsy and Amazon, but they are easy to make, fairly inexpensive, and kind of fun. It only takes about fifteen to make the balls. The felting process, where the fibers fuse together, takes a tumble in the washer and dryer. All you need to get started is a skein of 100% wool (or any other animal fiber, such as alpaca). You don't want to use any synthetic yarn because it won't felt properly.

I bought this skein from Joann's. I forgot to bring a coupon, so it was $6. 

I asked a nice granny-type to help me find the 100% wool options.

Start by wrapping the wool around your hand about twenty times.

Pull the wool off your hand and wrap around the center another twenty times.

Next, fold the two ends together.

Start wrapping the wool again and you'll soon have a little ball.

Continue wrapping until your ball is about the size of a tennis ball. I stopped when the ball fit comfortably in my hand. The balls will shrink with use, but this is a good starting size.

Cut the wool and tuck the end under a loop.

I ended up with four balls from my skein. Next time, I think I'll plan to make three slightly larger balls.

Next, you can recycle an old nylon for the felting process.

Put a ball in the nylon and tie off with a piece of ribbon. 

Repeat until all the balls are tied in the nylon.

Throw the balls in the wash on the highest heat setting.

The balls will be smaller after they are washed.

Finally, toss them in the dryer on your hottest setting.

I didn't noticed much difference in size after the dryer.

The finished project! You can see how the fibers have started to fuse together (felting). This will continue with each wash.

We've been scentless for awhile,but I thought it might be nice to use some essential oils for a subtle fragrance. I love lemongrass. Other options might be lavender, vanilla, lemon, or orange.

I dabbed about 15 drops of essential oil directly on the balls. I've since made more balls for our other laundry room (yes, we have a washer and dryer on each floor). With the second batch, I dabs 3-4 drops     every so often as I was rolling the balls.

I'm repurposing this little basket to store the wool balls. I will be making more soon!

I've heard that you should use anywhere from 3-6 balls at a time. To use, just throw them in dryer with your wet clothes.

***update***
I've now used the dryer balls for two loads. I can't speak to the savings in time to dry because our dryer uses a sensor and I'm usually nowhere near the laundry room when it's on (either I'm sleeping at night or downstairs during the day). But, I can definitely tell the difference with how soft our clothes are now. We haven't used dryer sheets for almost four years so I forgot all soft and cozy clothes can feel. I am SOLD! I am also addicted to making these balls so my family can expect to receive them for Christmas!

Linked to:
At the Picket Fence
Between Naps on the Porch
Folk
Home Stories from A to Z
House of Hepworths
Little Mom on the Prairie
Miss Information
Mums Make Lists
Nifty Thrifty Things

Monday, November 5, 2012

First year utility update

As we were preparing for our open house yesterday, we remembered how we were a little skeptical of the savings we would enjoy with a full ICF home. We knew that we would save money, but what we really wanted to see was hard numbers for an actual house, not percentages and averages.

We decided to pay it forward by offering our actual utility costs. Our house is 2,880 square feet (finished) = 1,700 in the unfinished basement.


We are amazed that we are paying much less than we did last year, in a house half the size of this one. Equally impressive is the fact that our actual costs will be nearly a thousand dollars less that the projected costs based on our low HERS score. 

The flyer with this information was very popular with the potential homeowners who toured our home this weekend. Several asked about the temperatures at which we kept our thermostat. 

In the summer, we often kept it between 76 and 78 degrees (F), not because we were trying to save more money, but because the house was quite cool and comfortable at that temperature. As a comparison, I was sweating at anything above 68 in our old house. 

In the winter, we kept the thermostat between 66 and 68, again, simply because that's where our home comfortable. In our old house, we kept it at 72 because I would be cold even while wearing warm clothes.

Another thing we didn't expect was how well the house holds the temperature. Yesterday, it was in the upper 30s. We had the thermostat at 68, but the house temperature went up to 70, with the furnace still off, just from all the people walking through. Last winter, we didn't turn on the heat until the temperature was 29 degrees outside, because the temp inside was still in the upper 60s!

We had a very hot summer this year, with several days in the 100s. Our electric bill in August was $150, nearly a hundred dollars less than we paid in our much smaller house a year earlier. 

One last thought: other than the first three months of the year, our gas bill has consistently been between $25 and $27 dollars. In January and February, the two coldest months of the year, our house was still under construction, and our March bill only reflected two weeks of occupancy (plus two weeks of workers going in and out all day). To compare, in our previous smaller house, we paid $168, $162, and $146 in January - March 2011. It's worth mentioning that our previous home was less than ten years old and fairly energy efficient as well, as we had a home energy audit before putting it on the market.

Sunday, November 4, 2012

Another open house on Nov 4th - 1pm - 5pm EST

For our local friends: Our house is open for tours tomorrow as part of' our builder's 2012 Fall Tour. Come on over and get some free CFL bulbs if you bring your old incandescents (up to 5). Our house is open from 1pm to 5pm (EST).

Thursday, September 20, 2012

Cook Book Shelves


My pantry is an ongoing work in process. I know what I want it to look like, but I'll be saving for my custom shelving for awhile yet. Someday, it will look something like this, but with Sherwin Williams Oyster Bay instead of the bright orange.
Source
In the meantime, I've been playing around with some ideas to make the best use of its ample space. One thing I knew I wanted when we designed the pantry was an appliance shelf. I wanted my appliances stored at waist level, with easy access outlets nearby. I didn't take a great before photo, but here's the idea.

We have 9' ceilings throughout the first floor, so there was a big empty space above the appliance shelf. I was browsing Pinterest when I found this idea:
2011_07_12-CherylCookbooks.jpg
Source: The Kitchn
For my own menu planning, I find that I use Pinterest, Ziplist, and binders full of my favorite recipes, which I store in my command center, like this:

However, there are a few cookbooks I like to keep nearby, like my Dutch cookbooks and other specialty cookbooks for which recipes are a little harder to find. I didn't want them taking up space in command center, so putting them face out, library-style, serves both practical and decorative purposes. 

Once again, we used our favorite Ribba picture ledges from Ikea.

For starters, we used two 451/4" shelves. They were easy to line up.

This looked nice.

But I picked up two more shelves the next time we were at Ikea.

Easiest project ever!

Linked to:
I Heart Organization * I'm an Organizing Junkie Mums Make Lists


Related Posts Plugin for WordPress, Blogger...