Showing posts with label home decor. Show all posts

Monday, March 31, 2014

Fun Ways to Use Washi Tape

I'm still working on getting my craft room organized so you'll be my posts will be a little crafty-heavy for the next little while. To follow up my washi tape storage solution, I've rounded up a few of the ways I've used washi tape around the house, as well as some super fun ideas from around the web.


We do a lot of color-coding around here. Washi tape is a fun way to identify items you don't want mixed up. For example, both our son and I have inhalers. A quick strip of washi tape means we don't have to worry about grabbing the wrong one.


Along the same lines, we use washi tape to color code our toiletries when we travel. I made this toiletry wrap several months ago for our toothbrushes.


We use the free toothbrushes from our dentist when we travel. At the moment, they are all different colors, but sometimes they are the same, so washi tape makes it easy to keep our toothbrushes apart.


A few months ago I moved our family calendar to our kitchen wall. Living with a brain injury means I don't have a busy social schedule. I soon realized that there was plenty of room for me to add my menu calendar to the week calendar...all with a little help from washi tape. 

Another popular labeling use for washi tape is to color code each family member's chargers, like this example from Delicious Spaces.


Washi tape is also pretty great for labeling cords, like this example from Neat Method. If I didn't have such awesome in-home tech support (aka The Hubby), I would be labeling all of the cords to our TVs, DVRs, Wii, and our techie gadgets. As it is I just stay away, far away!


One of my first home decor projects after we moved in the dream house was to make a glitter mirror. It's not quite washi tape because it was a lot harder to find two years ago. 


Washi tape is an easy way to spruce up a picture frame...or a contribution chart.


It's a little hard to see, but our son came up with the idea of using "his" washi tape to decorate his bedroom door.


I love this idea to from Crab & Fish to cover light switches with washi tape.


Using washi tape to create frames is a no-commitment way to add some color to your galleries. I like this example from iVillage.


My son's favorite idea in my Washi Pinterest board was this washi tape rocket from Sweet Rose's Studio


He also loved this idea from RS Designs.  Both ideas are low-cost ways to customize what you already have, a great solution for kids who change interests often!


Speaking of kids, here's a way to for little ones to decorate their toes without making a mess with polish. I think it might be fun for big kids, too! Thanks to Lebenslustiger for the idea!


I've seen cookie cutters as tree ornaments before, but I thing A Night Owl's idea to use washi tape is brilliant. I think I will be busting out my glittery washi tape next Christmas. 


I used knife racks all around my house. I like how Kim Vallee covered hers with washi tape.


I use these exact gift tags on totes all around our house. I think these washi-wrapped labels from Etsy seller Melissa Marie Russell are so creative. 


Lastly, I know a lot of people have noticed that tea lights are just the right size to be dressed up with a little washi tape. What Happened Next posted a pretty selection of washi-adorned tea lights.


You can find more washi tape ideas on my washi tape Pinterest board.

Follow Jen | de Jong Dream House's board crafts :: washi tape on Pinterest.

Linked to:
Creativity Unleashed linky party * Fluster Buster's Creative Muster link party * Make it Pretty Monday linky party

Tuesday, April 30, 2013

Silhouette Cameo Confession


I have a confession to make. Five months ago, my sweet husband took advantage of a Black Friday promotion and bought me the Silhouette Cameo I had been drooling over for almost two years. The confession is the number of times I've used it: none, zero, nada, zippo. 

Sigh.

As far as I know, there is nothing wrong with it other than it didn't come with a talking person who could show me how to use it. I'm a little overwhelmed. Since my brain injury, I have noticed that I have  a harder time learning new things. Where I used to be able to just read a manual and figure things out, now I need to be able to see each step or have someone walk me through it. I started cooking by following blogs that took photos of each step. I learned to sew because my friend Nicole walked me through my first couple projects. I have a bursting board on Pinterest of projects I would love to do with my Cameo. But I just can't figure out how to use it. Grrrr...

I'm hoping to get together with a new friend in the next couple of weeks for some Cameo tutoring. To gear up for our get-together, I put together a list of projects I really, really want to do. 

1. Vinyl lettering and labels

I love the labels we have in our freezer, but the foam stickers I used don't like the cold. They fall off if they're bumped. I would love to make vinyl labels to replace them. 

For that matter, I'd also like to update the labels in our frig, like how Project Simple Home has done. 

Please do NOT pin this photo from our page.  Please pin from the source.
Also, I used foam stickers to put a few friendly reminders around the house for my boys. They work pretty well, except for when my overly-tired son would rather pull off and rearrange stickers than use the toilet before naptime. I'd love to replace my stickers with vinyl. Glamorous, I know.

I have a bajillion other labeling and vinyl ideas.

2. Frosted/Etched Glass

Did you know you can make etched glass with a Silhouette? I'd love to customize our casserole dishes like The Real Coake Family has done. 
Homemade Christmas Gifts
Please do NOT pin this photo from our page.  Please pin from the source.
I also love what Dans Le Townhouse did with her mirror. I have "Imago Deo" (image of God) on our full length mirror, written in puffy paint. Niels loves the sentiment, but not the execution. This would look a lot nicer!
Please do NOT pin this photo from our page.  Please pin from the source.
I also really like this idea from eighteen25.
Please do NOT pin this photo from our page.  Please pin from the source.
Heat Transfer Shirts and Onesies

I would love to be able to make my train and space shuttle-obsessed boy custom tees like this one made by Craftaholics Anonymous.
airplane t-shirt
Please do NOT pin this photo from our page.  Please pin from the source.
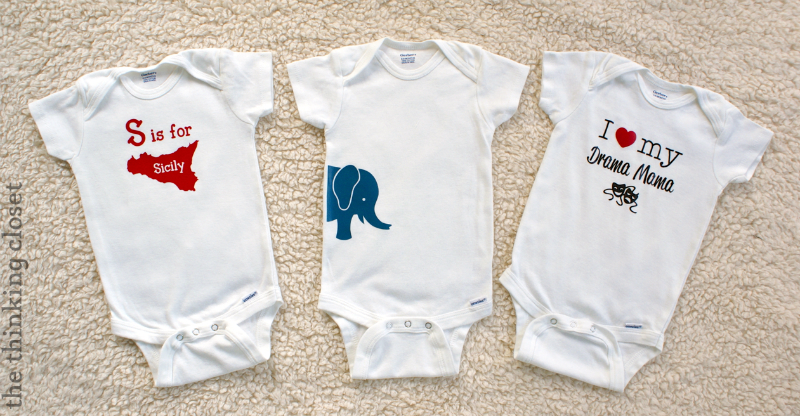
And I'd love to make custom onesies like The Thinking Closet has done for all the sweet babies my friends are having. 
Gender Neutral Onesies & Free Cut Files | The Thinking Closet
Please do NOT pin this photo from our page.  Please pin from the source.
Fabric Cutting
I am absolutely giddy about the idea of using the Cameo with my new love of sewing. How cute is this tooth fairy pillow?
Please do NOT pin this photo from our page.  Please pin from the source.
And I'd love to be able to cut out letters for monograms on quilts or to make cute projects like these days of the week dishags from Knitty Bitties.
Please do NOT pin this photo from our page.  Please pin from the source.
Other Projects

As part of my 2013 Pinterest Challenge, I want to make a growth chart ruler like this one from Adventures in Decorating and Design.  
Please do NOT pin this photo from our page.  Please pin from the source.
Click below to follow my ever-growing Silhouette inspiration board on Pinterest.

I'd love to hear from you. Do you have a super simple tutorial to get me started?

Linked to:
Crystal and Co.  * New NostalgiaReal CoakeSew Much Crafting * SNAP!

Tuesday, April 9, 2013

Bathroom Art Update

Here's a look at the most recent tweak to our family bathroom. 

Last summer, I made the cute bathroom art on PowerPoint after seeing something similar on Pinterest.


The only frames I had were black ones, so that's what I used:

There were fine, if not exactly what I wanted. But then I put up the chair rail photo gallery, with photos of our son's grandparents, aunts, uncles, and cousins. 

We lived several states to an ocean away from our family, so this is a great way to help our son remember who is who. Every morning and night he gives kisses to his family. (His favorite is my sister's dog, Meryl!)

I just love how it turned out. I especially love the blue and red frames.

The fun red and blue frames made me want to replace the black frames for the art. Alas, Ikea is two hours away. Finally, over Easter, we were in Toronto and were able to pop into the Ikea there. And wouldn't you know it, they were out of the Nyttja 8-1/2 x11 frames. I decided to get the next size up and make it work.

I found some cute striped wrapping paper at Target. (By the way, has anyone else noticed how hard it is to find wrapping paper that is not tied to a season or event?) If the frames were smaller, I could have used scrapbook paper, but I didn't want to have to piece together the paper. I was able to simply use the plastic insert as a template to cute the size I needed.

I also slightly modified the background of each sheet and printed them on photo paper to give them a glossier finish. Of course, I used command strips to hang them up. Best of all, the larger frames covered up the nail holes for the days of old when we didn't know how much easier pictures are to hang with command strips! 

If you'd like the full bathroom tour, check out the reveal.

Hard to believe we're making updates when we've only been in the house for a year, but that's the fun of  living in our dream house now that we're done planning and building it!

Linked to:
Clean & Scentsible * Crystal & Co. DIY Dreamer * Housewife How To's * Made in a Day My Uncommon Slice of Suburbia * Mums Make ListsNot Just a Housewife * Real CoakeSnap!

Thursday, September 20, 2012

Cook Book Shelves


My pantry is an ongoing work in process. I know what I want it to look like, but I'll be saving for my custom shelving for awhile yet. Someday, it will look something like this, but with Sherwin Williams Oyster Bay instead of the bright orange.
Source
In the meantime, I've been playing around with some ideas to make the best use of its ample space. One thing I knew I wanted when we designed the pantry was an appliance shelf. I wanted my appliances stored at waist level, with easy access outlets nearby. I didn't take a great before photo, but here's the idea.

We have 9' ceilings throughout the first floor, so there was a big empty space above the appliance shelf. I was browsing Pinterest when I found this idea:
2011_07_12-CherylCookbooks.jpg
Source: The Kitchn
For my own menu planning, I find that I use Pinterest, Ziplist, and binders full of my favorite recipes, which I store in my command center, like this:

However, there are a few cookbooks I like to keep nearby, like my Dutch cookbooks and other specialty cookbooks for which recipes are a little harder to find. I didn't want them taking up space in command center, so putting them face out, library-style, serves both practical and decorative purposes. 

Once again, we used our favorite Ribba picture ledges from Ikea.

For starters, we used two 451/4" shelves. They were easy to line up.

This looked nice.

But I picked up two more shelves the next time we were at Ikea.

Easiest project ever!

Linked to:
I Heart Organization * I'm an Organizing Junkie Mums Make Lists


Tuesday, September 18, 2012

Great Moments Great Room Gallery


At long last, our great room gallery is done! I started working on this around the same time as we hung our anniversary frames, which was about six weeks ago. It took forever, but I'm so happy with how it came out. Living with a brain injury, it's hard for me to remember things without visual cues. Seeing photos around my house fills me with a joy I didn't realize I was missing. I think this makes Niels happier about putting in the time to help me finish this project!

Since we moved into our house seven months ago, I knew I wanted to have a photo gallery on this big 14' high wall in our great room. 
I loved reading posts about other people's gallery, but I didn't find a lot of explanation about how these bloggers decided to arrange their galleries. So, here is more info than you probably ever cared to read about planning our gallery, showing probably the slowest possible way to do the job!

Like I said, I wanted  to put up a gallery, but the idea was been too overwhelming, so I couldn't get started. I had been searching Pinterst for photo gallery inspiration, and kept coming back to this one:
Picture Wall
Source: Martha Stewart
The center space and random but orderly layout appealed to both Niels and I. My favorite frame place suddenly stopped carrying the frames I wanted in all sizes, so I had to work a little harder to find inexpensive frames that worked together. These frames came from Flower Factory, Ollies, Menards, Target, and Pat Catan. 

For several weeks, the frames set out on the floor as I tried to figure out what kind of arrangement we wanted.

I knew I wanted to incorporate our monogram somehow, and maybe something that showed our Dutch side. My mom gave us these wooden shoes for our anniversary, so I played around with the idea of using them.

I decided to ditch the shoes on the wall. (I put them on the mantle instead) and spread out the letters.

The letters came from our son's nursery. His name was a surprise, so we always called him Baby DJ before his arrival. Most people thought it stood for Baby de Jong, but it was actually the initials of his first and middle names. At nearly four, he prefers his first name over DJ, so I took his letters for the gallery.
 
Then I covered them in the same metallic vinyl that I used in Marissa's room. 

I love repurposing things. Especially when it doesn't cost me a thing!

Next, I spent many sentimental days looking through all the photos since we met six years ago and trying to narrow down to my favorites. This is when I realized I'm going to need more galleries!

For this gallery, I tried to chose photos that captured a specific moment or day, like this one of Niels and our first "baby" Bailey, on her last day before we lost her to liver failure. I just love how this captures their love for each other. Even though she was my dog first, she sure became a Daddy's girl fast.

The process of selecting photos took a good week or so. I also printed more photos I loved that will go in the family gallery upstairs...eventually. Finally, I had all the photos ready and the arrangement set. 

And then life got busy. Marissa arrived. We were gone for a week for my sister's wedding. I was hit with a killer headache. I wasn't sure how to get the photos up on the wall.

Thanks to Pinterest, I found this great tutorial on how to use paper as a template.

First, I traced each frame onto paper. Eventually, I learned that it was easier to put the photo side down.

I cut out the template, and used tape and a Sharpie to match frames to their corresponding paper. I wrote the number on the template to intentionally indicate orientation.

I used a pen to mark where the nail holes should be.  

Some frames were easier to mark than others.

As I was working, I put the frames over the templates to prevent the papers from rolling.

Once all the templates were done, I realized that I needed to move all the frames over so I could be close enough to the wall to hang them up. 

So I slid all the frames and templates over about two feet.

We decided we wanted a two inch space between the upper and lower photos, so we eyeballed the middle of the room, and marked the space.

We used our infrared level to line up the templates along the line.

Then double checked that we liked where the center of the layout was placed. This would have been easier if we hadn't pushed the couch over.

Our couch is 36" tall, so we set the center gallery line between 64" and 66" from the floor. I taped the bottom frames down, and Niels did the uppers because I couldn't reach!

Once the template was up, we took a short break to make sure we liked it, since everything was eyeballed after the center line.

Next, we traced the corner of the template, before taking it down to figure the nail placement.

Then we put the template back up and put in the screw, removed the paper, and hung up the frame. We still had to make some adjustments, but that was due to my elementary cutting skills, I think. 

Numbering the templates and frames was brilliant, especially since we used many of the same size frames.

Once again, we stopped after hanging the center four frames to make sure we liked the look. We did.

We tagged team putting our son down so we could keep going. After all the delays, I was determined to finish before we went to bed!

While Niels was handling the drill, I was making sure the frames were ready to hang. Some of the bargain frames I bought didn't have hanging hardware, so I had to superglue them on. We also removed the stands because they prevented the frames from laying flat. Some people might not want to do this, but I know that I don't tend to change my decor for awhile, so I'm fairly certain we'll keep these frames in exactly the same place until they are old and dated.

It's too bad I didn't any ideas to re-purpose all those stands. 

It definitely took more than the five or ten minutes I had read that it would, but we liked the way it was coming along.

One of the (many) things I appreciate about Niels is his attention to detail and perfection when it comes to these kinds of things. Look at that nice clean line!

Finally, the last frame!

Niels took this photo at 11pm at night, with just the upstairs light and windows for lighting. I LOVE it!

The view from the stairs. I really, really like seeing photos of my favorite moments as soon as I walk downstairs to start my day.

After dropping D off school today, I was determined to finish the wall. Niels did all the heavy lifting last night getting the frames in. All that I had to do was the vinyl quote we picked up on our anniversary overnight date. I eyeballed the placement in the little dip on top. 

It says, "Capture the moments that take your breath away."


This is the fifth vinyl I've put up, so it's finally getting easier. (And really makes me want a Silhouette Cameo so I can make my own!)

The new view of our great room!


The finished wall!

View from the stairs. Here you can see where the wooden shoes ended up.

I like the way the glass in the mirrors reflect the light.

The metallic letters reflect light well, too.

I thought about covering the sides of the letter with vinyl or paint, but I like the subtle color difference between the metallic front, white sides, and SW Mindful Gray paint on the wall.

After sitting on the couch looking contentedly at our pretty new wall, I had just the push I needed to order the 24"x 36" family photo that will hang above the fireplace. The great room is thisclose to being done! But I'm really happy with how far we've come.


Visit thecsiproject.com
Related Posts Plugin for WordPress, Blogger...