Showing posts with label projects. Show all posts

Thursday, July 3, 2014

June Projects

I'm going to try to do a monthly recap post. I've been having so much fun in my craft room (and out with my family), that I haven't been posting very much. So here's a sneak peek at what I've was up to last month.

I finally finished my brother and sister-in-love's...ahem...Christmas gift, a Viking-Packer quilt I call "Black and Blue" division.


Here's the label. You can also see the fun binding. It's actually from a Mardi Gras collection.


We celebrated the end of D's preschool career. He loves school.


We joined a CSA so I have been busy scouring Pinterest for new recipes. 


We had our first garage sale. 


I made Niels a money bag (apron).

I finished a quilt for a sweet girl my friend was fostering. 


With a coordinating pillowcase. 


And drawstring bag. 


I was published again, and very pleased to learn that my story is the very first one!


We watched a lot of World Cup soccer/voetbal. 


We gave up on the first lawn we put in two years ago. A freak windstorm swooped in and stole our seed so it was one big garden of weeds.


Less than twenty minutes after the new seed was sprayed, a freak flash flood hit. Sigh...


We are now on our third attempt at a backyard. 


We've done lots of science experiments


I made a baby quilt for friends in Wisconsin.


And attempted free motion quilting. 


I discovered how to make homemade Mama Chia


I designed a block for NASA astronaut Karen Nyberg's star block challenge.


I hit some early sales to get D's school uniforms ready.


And my second.


And my third and fourth.


I stumbled onto the BEST garage sale. A man was setting up a sale because his wife passed away (that part's not so great). She was an avid sewer and had totes and totes of fabric and notions. I got first nibs and came away with all this for $35!


Here's a better look at the stack of fabric. That bottom piece alone is five yards!


I made D some space-theme pajamas.


And then, because he asked nicely, I made him another pair.


And lastly, I supervised a lot of workbook time, aka "earn tech time."


Hopefully July will see a few more blog posts, but then, it is summer, so I wouldn't be too sure!

Linked to:

Monday, March 31, 2014

Fun Ways to Use Washi Tape

I'm still working on getting my craft room organized so you'll be my posts will be a little crafty-heavy for the next little while. To follow up my washi tape storage solution, I've rounded up a few of the ways I've used washi tape around the house, as well as some super fun ideas from around the web.


We do a lot of color-coding around here. Washi tape is a fun way to identify items you don't want mixed up. For example, both our son and I have inhalers. A quick strip of washi tape means we don't have to worry about grabbing the wrong one.


Along the same lines, we use washi tape to color code our toiletries when we travel. I made this toiletry wrap several months ago for our toothbrushes.


We use the free toothbrushes from our dentist when we travel. At the moment, they are all different colors, but sometimes they are the same, so washi tape makes it easy to keep our toothbrushes apart.


A few months ago I moved our family calendar to our kitchen wall. Living with a brain injury means I don't have a busy social schedule. I soon realized that there was plenty of room for me to add my menu calendar to the week calendar...all with a little help from washi tape. 

Another popular labeling use for washi tape is to color code each family member's chargers, like this example from Delicious Spaces.


Washi tape is also pretty great for labeling cords, like this example from Neat Method. If I didn't have such awesome in-home tech support (aka The Hubby), I would be labeling all of the cords to our TVs, DVRs, Wii, and our techie gadgets. As it is I just stay away, far away!


One of my first home decor projects after we moved in the dream house was to make a glitter mirror. It's not quite washi tape because it was a lot harder to find two years ago. 


Washi tape is an easy way to spruce up a picture frame...or a contribution chart.


It's a little hard to see, but our son came up with the idea of using "his" washi tape to decorate his bedroom door.


I love this idea to from Crab & Fish to cover light switches with washi tape.


Using washi tape to create frames is a no-commitment way to add some color to your galleries. I like this example from iVillage.


My son's favorite idea in my Washi Pinterest board was this washi tape rocket from Sweet Rose's Studio


He also loved this idea from RS Designs.  Both ideas are low-cost ways to customize what you already have, a great solution for kids who change interests often!


Speaking of kids, here's a way to for little ones to decorate their toes without making a mess with polish. I think it might be fun for big kids, too! Thanks to Lebenslustiger for the idea!


I've seen cookie cutters as tree ornaments before, but I thing A Night Owl's idea to use washi tape is brilliant. I think I will be busting out my glittery washi tape next Christmas. 


I used knife racks all around my house. I like how Kim Vallee covered hers with washi tape.


I use these exact gift tags on totes all around our house. I think these washi-wrapped labels from Etsy seller Melissa Marie Russell are so creative. 


Lastly, I know a lot of people have noticed that tea lights are just the right size to be dressed up with a little washi tape. What Happened Next posted a pretty selection of washi-adorned tea lights.


You can find more washi tape ideas on my washi tape Pinterest board.

Follow Jen | de Jong Dream House's board crafts :: washi tape on Pinterest.

Linked to:
Creativity Unleashed linky party * Fluster Buster's Creative Muster link party * Make it Pretty Monday linky party

Tuesday, September 24, 2013

Printable | Project Box Labels


Hi. My name is Jen, and I am addicted to quilting. Seven months ago, I touched a sewing machine for the first time since high school. In April, I completed my first quilt. I'm currently working on my ninth quilt!

My DIY craft table has a ton of storage to help me rationalize my growing fabric addiction. There are eight cubbies on each side, and four on the end. Each cubby holds two Sterilite deep clip boxes (<--affiliate link). I store fabric sorted by color and type on one side and on the end.


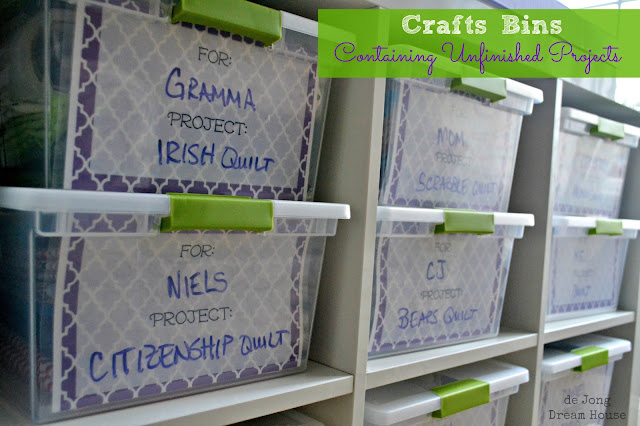
On the other side of the table (close to my sewing machine), I store my project boxes. I started off with purple index cards, like this.


But I wanted something a little prettier that could be re-used as I finish one project and get ready for the next. I made a quick form with PowerPoint. 


I sent the file to Staples to be printed and laminated. 


Pretty AND re-usable. Check!


The laminated card fits perfectly in the front of the box. 


Inside the box, I keep all the fabric I need for a specific project, the pattern or inspiration, as well as thread and any notions. This is a really convenient way to have everything together when I need to run into a fabric store as I'm selecting fabric or looking for a complementary pattern for the backing or binding. 


Looks like I'll be busy for awhile. 


If you'd like to make your own labels, click on the link below the photo to download the file from Box.com.
Related Posts Plugin for WordPress, Blogger...