Tuesday, February 19, 2013

Unpaper Towels

It's a been a rough couple of weeks for me as my brain injury is causing some problems. So instead of doing fun things like blogging, I've been doing a lot of sleeping and resting. But I am happy to report that I finished the first of my 2013 Pinterest Challenges: The Un Paper Towel

What are Unpaper Towels? Unpaper towels are cloths designed to look like disposable paper towels. It wasn't that long ago that I'd go through a roll of paper towels every month or so. Then I discovered Lysol wipes and used them everywhere. As I started turning green, I realized that not were those wipes wasteful, but also full of chemicals. 

It wasn't an overnight switch. I started by putting out cloth towels and hiding the paper towels in the pantry. Soon it became more convenient to grab the cloth. Then we started using cloth napkins at the table instead of paper towels or napkins. Around this time, my son was old enough to learn where the clothes were stored and he naturally began looking for them when he had a mess to clean up. 

We've been using cloth in our kitchen with homemade cleaners for quite a while now, but I liked the idea of having pretty matching clothes. I was also looking for an easy project to learn to sew. These fit the bill perfectly.

This was my very first sewing project since my high school class over (cough) 20 (cough) years ago. I picked up a $39 sewing machine at Big Lots a few months ago and it has been sitting patiently in my linen closet waiting for me to open the box. 

I'm not sure if it's because I'm older or because of my brain injury, but I don't learn new things as easily as I used to. I used to be able to read a manual and I'd understand how to operate something. Now, I learn best when someone can walk me through the steps. My new appliances, driving to a new place, figuring out my sewing machine, it doesn't matter. Enter my new best friend: Nicole, who generosity offered to make the unpaper towels with me. 

First step: we went to Joann to pick out supplies. For this project, our instructions said we needed 1/2 yard each of terry and flannel fabrics to make ten 10" x 10" towels. (As it turned out, we made 12" x 12" towels, because Nicole had a 12" square template. The slightly larger towels meant that we were only able to make six towels with this amount of fabric, with a long narrow piece left over. If you want 10-12 12" towels, I'd suggest getting the full yard). There wasn't a great variety of fabric to choose from that matched the grayish green of our kitchen, especially with the terry, so I went with the same lime green that seems to be so popular in kitchen supplies these days. For the flannel, I found a cute bike pattern that seemed fitting for our Dutch family.

There was a much wider selection of thread, so it was easy to find a matching spool. We also bought a strip of (way too much) velcro. 

Because I was brand spanking new to sewing, I also bought some pins and a fabric cutter. Back when I was in high school, we cut with a scissors, but this cutter was $10 well spent!

We spent some time looking at quilting squares to make cutting the squares easier. But I balked a paying $25+ for something I might not use again. (I later found one for much less on Amazon). I decided to look around at a few other craft stores, and I came up with a great solution when a worker at another store gave a piece of cardboard from their scrapbook paper stacks. Perfect!

Two weeks later, Nicole and I were able to get together to work on our project! We had each washed our fabric and were ready to go.

Step one. Use the template and rotary cutter to cut out 6 squares each of terry and flannel fabric. The cutter was super easy to use, and my free template was (no) money well spent. I used our photo mat so I wouldn't scratch our table (more). Nicole had a bigger mat, which I think would be a great investment for future projects.

My cuts were not always as nice as the photo above, but this really was the perfect first project. After all, I'm just making pretty rags! Here's the stack of squares when I was done. And you can get a peek at my cute little machine. I should have taken a picture of it!

I think this is why the instructions from A Blossoming Life said to make 10" squares. I'm not sure what I'll do with this extra fabric. 

Step two: pin together one piece of flannel and one piece of flannel. Make sure the print side of the flannel is on the inside. 

This is the point at which I realized that I didn't cut my pieces exactly even. 

Step 3: Thread the machine. Nicole was kind enough to do this for me the first time. My machine has numbers to show the whole process, which made it easy for me to thread the machine later. My son was very interested in this process. 

Step 4: Sew the two pieces together, but leave about a 3" gap so you can pull the fabric right side out. Yes, I forgot a couple of times and had to use my seam ripper to cut out a few inches. (Fun fact: I already had a seam ripper in my kitchen. It works great for opening up plastic around bottles, CD cases (remember those), and anything else with a tightly wrapped seal. 

It took me a little bit to get a feel for my machine so I could sew in a straight line. 

Step 5: Turn out fabric. It took a bit of tugging, but by the last one, I was able to work with a 2" hole. I followed A Blossoming Life's tip to trim the corners to make this step easier. 

One down, five to go. Some people might iron at this point, but I just smoothed down the seam with my fingers.

It almost looks like I know what I'm doing!

Step 6: Sew over the whole thing again to make it pretty. My corners are not so pretty. I had a hard time figuring out how far to go before turning my fabric. 

Step 7: Sew a line diagonally across the towel. This will keep the towel flat after washing. 

Step 8: Repeat for the rest of the towels.

This was our finishing point of the day. All that we had left was the velcro. Nicole and I decided that would be a good job to do in our homes while watching a movie.

Two weeks later, I got back to it. I put the fuzzy half on the flannel side, and the scratchy half on the terry side. I found that hand sewing the velcro on was much harder than the cutting and sewing part. 

Another option is to use snaps instead of velcro, like Thrifty Nifty Mommy did in this post. I think I like the snap idea better than the velcro because it makes a neater finished product, but it required snap pliers, another purchase I wasn't willing to make until I knew if I like sewing or not. 

Don't these look nice?
UnPaper Towels by Thifty Nifty Mommy
I opted to put squares of velcro only at the top and bottom of each towel because by this point, I was pretty sure that I would be storing these in my cloth drawer instead of cluttering up my counter. But for the sake of this post, I plugged away.

Halfway done!

Completely done! Most directions say to wrap the towels around an empty paper towel holder. Since we haven't bought paper towels for at least two years, I skipped the tube. 

Flip side.

For now, the towels are sitting on my baking counter, but as they are used and washed, I'm definitely putting them in my cloth drawer. 

Verdict:
With the exception of the velcro or snaps, these unpaper towels are very easy to make, even for a beginner. Without the fasteners, the whole project could easily be done in one afternoon. It's a pretty way to go paperless in your kitchen. They've quickly become my son's favorite napkin.

Of course, if you don't want to take the trouble to make these yourself, you can find over a thousand options on Etsy!

Update:
I decided I really don't like to have towels on the counter so we bought this Umbra paper towel holder and installed it on the cabinet door under the prep sink.

This works much better for us!

Are you following us on Facebook and Pinterest?

Linked to:
52 Mantels * Becoming MarthaBetween Naps on the Front Porch * Crystal & Co. * CSI Project Delightful OrderDIY Dreamer * Flutter Buster  * Frugally SustainableHappy Go LuckyHouse of Hepworths * Housewife How To's (featured) * I Heart NaptimeMade in a Day * Mums Make Lists (featured) * My Uncommon Slice of SuburbiaNot Just a HousewifeNY Melrose Family * Real Coake * Thank Your BodyUncommon Designs
Housewife How To's Visit thecsiproject.com

Monday, February 18, 2013

One Year in the Dream House

We can hardly believe that one year ago today we were moving to our dream home! We're working on a post detailing how we feel about our home now that we've lived in for a year: what we love, what we might have changed, what things we're still tweaking. Stay tuned!

In the meantime, here's a little trip down memory lane.
first boxes in the kitchen. Unfortunately, that one on the left scratched the marble. Patina!
Our great room before we figure out a layout. 
Unloading the Penske truck and POD.
I love this picture because it shows what awesome new neighbors we have. Most of the street came down to welcome us and  bring heavy furniture upstairs!
And we were greeted with cookies! 
It was an exhausting, wonderful day!

Friday, February 8, 2013

A Gallery in Progress

My headache finally broke yesterday and I was able to do a little catching up around the house. Over the last few days, I've spent a lot of time in bed admiring the "we do" gallery in our room. I also spent a fair amount of time cuddling with my son in his room, reading books and not admiring this wall.

We haven't posted a tour of his room yet because although I love the other side of the room, I've been a little uninspired with this side. 

I made the good night art about six months ago:

But it was really just put up to be close to our son's bed. There wasn't much order to the design. Yesterday, I had the idea to move the two pieces of good night art on either side of his mirror. 

I've been trying to figure out a way to put all the fun printables I've been seeing to good use. I came up with the idea to create rows of printables above and below the mirror and good night art. Now that our son is obsessed with reading, I wanted to fill his room (and time before sleeping) with Scripture and words of wisdom and affirmation. I spent a good couple of hours printing and creating the printables I wanted using shades of blue, red, yellow, and gray. (And yes, you can see a peek of another project in process in the corner.) 

I made the following three printables. The first is something I often say to D:

The second two were inspired by Pinterest (here and here).


I also played with the Power Point artistic effects to create two fun photos. This one, using cutout, was taking the day before the carpet was put down in D's room. He and Niels were having such a fun time talking. 

This photo is one of my favorites from the build. We came to visit the house one day when there was a bit of dust on the floor. I think maybe it was right after the trim went in. D is a pretty serious kid, but he started dancing around to make the dust kick up and I captured this shot.

I had a lot of fun playing around with Power Point's artistic effects. 
I really like this one:

But decided to print out this one instead:

Last night, as Niels was putting D to bed, I borrowed his mirror and good night art to work on a pattern.  He was so curious, he had to come check it out.

He has so much fun looking and everything and reading all the words. He'll have to wait a few days for it to be completed because we are driving to Ikea this weekend to pick up some more blue and red Njttja frames. Stay tuned!

Thursday, February 7, 2013

Paint Tour

It's been pretty quiet on the blog this week. I've been down and out with a pretty nasty headache and fatigue the last few days. My brain injury is winning this round, but it won't win the fight.

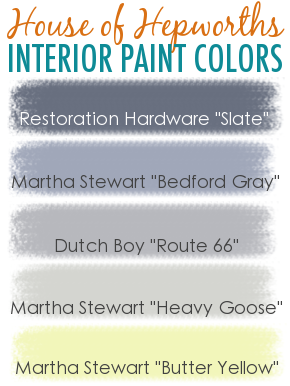
One of my favorite bloggers, House of Hepworths, recently added a cool graphic with her interior paint colors. 
Source: Sidebar from House of Hepworths. NOTE: Please ignore the above pin if you like this and pin from the House of Hepworth's site. Thankyouverymuch.
I liked the way it looks, and we are often asked about our paint selections. Our original paint post was done before our house was painted, so it was time for an update. First, here is a look at all of our colors together:

As you can see, we mostly stayed with gray tones. For our four-year-old's bedroom and bathroom, we used more vivid colors. 

Here's a look at how these colors look in context.

I love purple. It's been my favorite color for as long as I could remember. It's the color of my favorite football team (Skol Vikings!) and our wedding colors were platinum and plum. When Niels said it would be fine with a purple bedroom, I was thrilled. We settled on this grayish-purple, with a very fitting bedroom name:
In addition to our master bedroom, we also used Sensuous Gray in our bathroom's water closet. I've included larger color samples, along with the grid so readers can easily find the correct card at their local Sherwin Williams store. We're considering one of the two darker shades for our front door once the weather warms up.

We knew we wanted a greenish-gray kitchen as soon as we fell in love with our backsplash tile
In addition to our kitchen, we used Oyster Bay in our in-law suite, pantry, dinette, and both laundry rooms.

We knew we wanted a darker, more dramatic gray to provide contrast to our lighter, more neutral gray.
We used Dovetail in our guest room, office, and master bathroom.

In our old house, we used a standard beige colors. We knew we wanted to go with gray neutrals in our new house, and Mindful Gray fit the bill perfectly.
We used Mindful Gray in the great room, mudroom, both master closets, in-law bathroom, foyer, stairway, and upstairs hallway.

At the time we were selecting our paint colors, our then two-and-a-half-year-old loved yellow and begged for a yellow room. We were able to compromise with a yellow closet and bathroom. I was torn between using Solaria or Sensuous Gray for the powder room, but we opted for yellow to better go with our Dutch theme. Of all the colors, Solaria has the most variance over the course of the day. It's rarely as buttery as it looks in the photo on the left below. In our powder room, with its large window, it can look anything from very pale, almost white, to dark, nearly neon. The photo on the right below is a good compromise of all the shades it shows.

I am happy that we were able to convince D to go with a blue room because it is his new favorite color. We chose Scanda because it was bright, fun, matched his new train sheets, and was not yellow.

Linked to:

Friday, February 1, 2013

Missing Bailey

Disclaimer: I'm feeling sappy today. Thinking about another blogger who has lost her four-footed family member has made me a little sentimental. If that's not your thing, feel free to skip this post and come back for more green living and home projects soon.

As we approach the one-year mark since moving into our dream house, Niels and I have talking about the things we love about our new house and what things we would have changed--using the same budget. The discussion got me looking through old notes and photos and I found this one.


This is the only photo we have of our sweet Bailey at our new house. This photo was taken almost exactly two years ago. Usually she stays home when we run our errands, but I think maybe she had a date at the puppy spa and we stopped to look at the lot. At any rate, I'm so glad I have this photo. It was only a few days after this that we found out she was dying from liver disease. 

It came on incredibly fast and within two weeks, she went from perfectly healthy to gone. I will never forget that as we were leaving the animal hospital to bring her home after learning that she would not recover, I got a text that a friend of mine who went into early labor and very nearly died from her complications. She and her son are thankfully well, but his birth and Bailey's death will always be entwined in my mind.


Bailey's impending death was also the reason we bought our Nikon D3100. We had a last weekend with Bailey in which we took over a thousand photos, including the much loved family photo at the top of this post. 

Another photo I just love is this one of Bailey giving "the paw." Bailey conveyed so much without words. When I first sustained my traumatic brain injury, we spent many hours sleeping and resting together. She clearly understood that something was different. She loved the extra time with me, I'm sure, and at that time she started to simply place her paw on my hand as a way of assuring me that everything would be all right. One of her last gestures was placing her paw on mine as we said goodbye.

If I could change anything about our new home, it would be that Bailey would have moved here with us.


Bailey was originally my dog, but she quickly became a daddy's girl after Niels and I married. She wasn't as sure about D, but they were just becoming friends when she left us.  

These next two photos are a great picture of their relationship at the end. Tender-hearted D saw Bailey shivering, so he brought her his coat. She wasn't sure what to think.  

But she accepted the gift of his coat. And his shoe.

As it turned out, just before we were to bring a new puppy home, we learned that D is severely allergic to dogs. We were purchasing the pup from a friend, who was happy enough to keep him. Knowing that Bailey was our only four-footed family member makes her loss even harder for me. She is prominently featured on our great room gallery, and half his life later, D still points to the pictures and says, "That's Bailey dog. She lives with Jesus now." Such a great example of why I love being surrounded by photos of our favorite people and moments.


If you've made it this far, you might appreciate my last words to Bailey.

Early Morning Thoughts on the First Day After

Walking back to our car was first worst thing.
No tugging on your leash
No jumping to the seat
My lap was empty with only your collar.
The rain mimicked our tears.
Pulling into the driveway,
I couldn’t help but look through the window
To see that you weren’t perched on the couch
I swore we heard your "woof woof woof"
And the jingle of your collar when we stepped inside
You’re nowhere
And everywhere.
Your leash hangs silently on its hook
Your dish disheveled on the floor
Your food, untouched.
The indentation of your withered body
Still caves your favorite spot on the sofa
Your favorite toy lays lonely on the floor
Your last treat remains, half enjoyed.
It was time, sweet girl.
But not enough time.
At nighttime, you were part of our routine
One last trip outside
One last sip of water
Last night’s lasts were the last lasts.
You didn’t bound up the steps
Brushing my leg in your rush to our room.
How can our big bed suddenly feel so small?
How can our thick comforter lack any warmth?
You didn’t lick my husband’s ears.
You didn’t cuddle into my side.
How can I possibly sleep?
I woke up early and often
And you weren’t there to coax me back to slumber.
My husband slumbers
Because you weren’t there to wake him with a nuzzle
And request to go outside.
I sit here
still feeling the tremor of your last days
And thanking God for all of our good days.
I peek in on our young son
And wonder how we’ll make him understand
That our vet couldn’t “fix it.”
Couldn’t heal you.
How will I answer when he looks for you?
No more shared meals with a toddler.
I’ll have to start sweeping the floor.
You were my helpful shadow,
And the reflection of my life doesn’t look right now.
Who will tell me when the mail is here?
Or the garbage is being picked up?
That company has come?
Or that Daddy is home?
I have no wild barking to calm.
No tummy to rub.
No four-footed observer in my kitchen.
An empty space under
—and empty chair at—our dinner table.
Our laps will remain empty
Our hands won’t know what to do.
No more 8 o’clock bursts of energy.
White flashes around the room.
No more smiles of pure joy.
No more paws upon our hands.
No more thump-thump as you jump to the floor.
In the coming days,
We’ll remember what we forgot.
All the sounds you made as the symphony of our home.
Your stage is silent.
How can one who cannot speak say so much?
You’ve been so much more than a dog.
You were my heart on training wheels.
And you taught me how to love.
You’ve been a mile marker in my life.
You’ve been with me from single to married to mommy.
You’re part of all my important moments.
I don’t know why I thought if I lost you now,
It would be easier somehow.
What is ever easy about a final goodbye?
I miss you, sweet girl.
Thank you for being part of my life.
Thank you for a good life.
Thank you.

In memory of Bailey Grace with a Silly Face
April 14, 2001 – March 5, 2011


Related Posts Plugin for WordPress, Blogger...